menu

Saturday, September 14, 2013

How To Format The Unformatable Pendrives

Problem:
I am unable to format my pendrive or delete some files in my pendrive.So how can i format my pendrive?
Why This Problem Occurs?
When your pendrive contains virus files it will constantly processing with your Pc.And each virus
are coded differently 
and its difficult to delete some infected files or format your pendrive.
Solution:
  • Goto Start –> Run.
  • Type Cmd & press Enter.
  • Type the following
          Format/x J:
  • Here J: refers to your removable dsik drive letter.
  • Press Enter.
That’s it your unformattable pendrive problem is fixed.

How to format a write-protected pendrive or memory card

Removing write-protection in the Registry using Regedit.exe

In any version of Windows from XP onwards, run Regedit.exe (searching regedit will usually show the program at the top of the list).
Navigate to the following key:
Computer\HKEY_LOCAL_MACHINE\SYSTEM\
CurrentControlSet\Control\StorageDevicePolicies
Regedit_Storage_Device_Policies_thumb
Double-click on the WriteProtect value in the right-hand pane of Regedit.exe. Change the Value data from 1 to 0 and click OK to save the change. Close Regedit and restart your computer. Connect your USB drive again, and you should find it is no longer write protected. You can now format the drive as normal by right-clicking on it in My Computer and choosing Format.
If you can’t find StorageDevicePolicies, you can try creating a key by right-clicking in the white space in the Control folder and choosing New -> Key and carefully entering the name.
Regedit_new_Key_thumb
Now double-click on the new key (folder) and right-click once again and choose New -> DWORD. Name it WriteProtect and set its value to 0. Click OK, exit Regedit and reboot your computer.
If this method doesn’t work, try the following:

Removing write-protection using Diskpart

With your USB drive plugged in, launch a command prompt. Do this by searching for cmd.exe in the Start menu (or Start screen in Windows 8). In Windows XP, click Start then Run, and type cmd.exe in the box.
NOTE: you may need to run Cmd.exe with administrator privileges if you see an “access is denied” message.
To do that, right-click on the shortcut and choose Run as administrator. In Windows 8, simply choose Command prompt (admin).
Now, type the following, pressing Enter after each command:
diskpart
list disk
select disk x (where x is the number of your USB flash drive – use the capacity to work out which one it is)
attributes disk clear readonly
clean
create partition primary
format fs=fat32  (you can swap fat32 for ntfs if you only need to use the drive with Windows computers)
exit
Remove_write_protection_Diskpart_thumb (1)

Wednesday, September 11, 2013

Net Frame Work 4.0

Free Download .Net Frame Work 4.0 Requirement


For Download Click On Download Button

Tuesday, September 10, 2013

Acer Aspire 5750Z (AS5750Z) for Windows 7

Acer Aspire 5750Z (AS5750Z) Notebook Figure
Acer Aspire 5750Z (AS5750Z) Notebook
Download Acer Aspire 5750Z (AS5750Z) Notebook Driver and Utilities for Windows 7 32bit
Intel Chipset Driver

Download
Huawei 3G Module Driver
Download
Intel SATA AHCI Driver
Download
Intel iMAT Driver
Download
Realtek Audio Driver
Download
Atheros Bluetooth Driver
Download
Broadcom Bluetooth Driver
Download
Broadcom Card Reader Driver
Download
Broadcom LAN Driver
Download
ELANTECH Touchpad Driver
Download
Synaptics Touchpad Driver
Download
Intel Turbo Boost Driver
Download
Renesas USB 3.0 Driver
Download
Intel VGA Driver
Download
NVIDIA VGA Driver
Download
NVIDIA VGA Driver (PhyX)
Download
Intel WiMax Driver
Download
Intel Wireless Display Driver
Download
Atheros Wireless LAN Driver
Download
Broadcom Wireless LAN Driver
Download
Intel Wireless LAN Driver
Download
Applications and Utilities
Acer 3G Application
Download
Acer Updater
Download
Dritek Launch Manager Application
Download
Intel Turbo Boost Application
Download


Download Acer Aspire 5750Z (AS5750Z) Notebook Driver and Utilities for Windows 7 64bit
Intel Chipset Driver


Download
Huawei 3G Module Driver
Download
Intel SATA AHCI Driver
Download
Realtek Audio Driver
Download
Atheros Bluetooth Driver
Download
Broadcom Bluetooth Driver
Download
Broadcom Card Reader Driver
Download
Broadcom LAN Driver
Download
ELANTECH Touchpad Driver
Download
Synaptics Touchpad Driver
Download
Intel Turbo Boost Driver
Download
NEC USB 3.0 Driver
Download
AMD VGA Driver
Download
Intel VGA Driver
Download
NVIDIA VGA Driver
Download
NVIDIA VGA Driver (Physx)
Download
Intel WiMax Driver
Download
Atheros Wireless LAN Driver (HB95/HB97)
Download
Broadcom Wireless LAN Driver
Download
Intel Wireless LAN Driver
Download
Applications and Utilities
Acer 3G Application
Download
Acer Updater
Download
Acer Webcam Application
Download
Acer ePower Management Application
Download
Dritek Launch Manager Application
Download
Intel Turbo Boost Application
Download
Intel Wireless Display Application
Download

Thursday, September 5, 2013

Error Reporting in XP

Error Reporting in XP


If error reporting in XP is bugging you then turn it off.

When a system error occurs in XP, a little dialog box appears asking if you want to report the error to Microsoft. Click the message box to make it disappear. You don't have to report the error if you don't want to and on today's "Call for Help" Leo shows you how to turn off the feature if you find it distracting.

To disable error reporting, follow these directions:

1. Right-click My Computer and choose Properties.
2. Click the Advanced tab on your System Properties dialog box.
3. Click the Error Reporting button on the Advanced tab.
4. Place a checkmark next to "Disable error reporting."
5. Leave the other radio button unchecked next to the text labeled, "But notify me when critical errors occur."
6. Click OK.

Wednesday, September 4, 2013

Hidden Programs In Windows XP !

Hidden Programs In Windows XP !

Is it strange to hear , but true that some good programs are hidden in Windows XP !!!

Programs :

1. Private Character Editor :

Used for editing fonts,etc.
** start>>Run
** Now, type eudcedit

2. Dr. Watson :

This an inbuilt windows repairing software !
** start>>Run
** Now, type drwtsn32

3. Media Player 5.1 :

Even if you upgrade your Media Player, you can still access your old player in case the new one fails !!!
** start>>Run
** Now, type mplay32

4. iExpress :

Used to create SetupsYou can create your own installers !
** start>>Run
** Now, type iexpress

How to "Delete administrator Password" without any software

How to "Delete administrator Password" without any software

Method 1

Boot up with DOS and delete the sam.exe and sam.log files from Windows\system32\config in your hard drive. Now when you boot up in NT the password on your built-in administrator account which will be blank (i.e No password). This solution works only if your hard drive is FAT kind.

Method 2

Step
1. Put your hard disk of your computer in any other pc .Step 2. Boot that computer and use your hard disk as a secondary hard disk (D'nt boot as primary hard disk ).Step 3. Then open that drive in which the victim’s window(or your window) is installed.Step 4. Go to location windows->system32->configStep 5. And delete SAM.exe and SAM.log
Step 6. Now remove hard disk and put in your computer.
Step 7. And boot your computer :-)

Permanently deleted files Recovery solution

All (Ctrl+Alt+Del) Permanently deleted files Recovery solution

Sometimes we delete the files permanently, and realize that deleting them is like a Blunder...

For all those folks,
Here is the solution

Software called "Kissass Undelete" , can bring those files from the hard disk or your flash drive.
Conditions : Only if the data on that drive is not re-occupied(or written). that means the space which was available after the deletion is not been occupied after the deletion.

Click Here to download the .

1)
To start searching for the files,
Select the drive from the Left panel of the Windows and Click the scan button.
the Scan might take upto 10 secs.

2)
When the files search has been completed, it will show you the results with the name, typ, size and the last modified date of the searched file.

3) Now you can select the file to be recover. This is an Open source application and available for All Windows OS(Windows XP/Vista/ 7).

Friday, August 30, 2013

Add Embed IP Address Widget Of Visitor On Your Blog Or Site

Add Embed IP Address Widget Of Visitor On Your Blog Or Site

Embed IP Address Widget Of Visitor On Your Blog Or Site

Embed this on your Website or Blog now to show your visitor of Your Website or Blog that i am tracking you so don't try to do any illegal.Visitor can see there IP Address, the Operating System that he is using, from which country they belong and His browser name with version.Get free IP address widget for your blog or website. simply just chose one of IP address widget below and copy this code and past it to your website or blog, where you wanted to post.
Features:
1.) IP Address Tracker.
2.) Operating System Tracker.
3.) Country Tracker.
4.) Browser Tracker.
5.) Quick To Load And Easy To Embed.
6.) Two Different Dimensional Widget.

How To Add In Blogspot?
1.) Go To Your www.blogger.com
2.) Open Your Desire Blog.
3.) Go To Layout.
4.) Click "Add A Gadget" Where You Want To Add It.
5.) Now Scroll To "HTML-JAVASCRIPT"
6.) Click "+" Icon To Add It.
7.) Now Copy The Below Code And Paste It To There.
8.) Leave The Title Empty.
9.) Click Save, Now You Are Done.


How To Add In Website?
1.) Just Go To Your HTML File.
2.) Now Copy The Below Code And Paste It Between <body> </body>.
3.) Save It, Now You Are Done.


Embed IP Address Widget Of Visitor On Your Blog Or Site
<p><span style="text-align:center; display: block;"><a href="http://exeideas.blogspot.com/2011/04/how-to-embed-ip-address-widget-of.html"><img src="http://www.wieistmeineip.de/ip-address/" border="0" width="125" height="125" alt="IP Address Checker" /></a><br /><small><a href="http://trickshome786.blogspot.com/2013/06/Embed-IP-Address.html">Want This</a></small></span></p>
   =================M SADEEM=================

Embed IP Address Widget Of Visitor On Your Blog Or Site
<p><span style="text-align:center; display: block;"><a href="http://exeideas.blogspot.com/2011/04/how-to-embed-ip-address-widget-of.html"><img src="http://www.wieistmeineip.de/ip-address/?size=468x60" border="0" width="468" height="60" alt="IP" /></a><br /><small><a href="http://trickshome786.blogspot.com/2013/06/Embed-IP-Address.html>Want This</a></small></span></p>

How To Add Twitter flying Bird In Blog

How To Add Twitter flying Bird In Blog


Copy This HTML Code


<script type="text/javascript" src="https://piushtrivedi.googlecode.com/svn/bloggerwidget/hindi4tech-tripleflap.js"></script><script type="text/javascript">
var twitterAccount = "Enter Your Twitter Id Name ";
var tweetThisText = "Blogger Tips Seo Tricks -Aptech India http://www.djcomputerz.blogspot.com";
tripleflapInit();
</script><noscript><span style="font-size:11px;">Flying Twitter Bird Widget By <a href="http://www.Trickshome786.blogspot.com">Aptech</a></span></noscript>


 And Copy This Code
Go To Blogger Dashboard


Then Click On Layout


Click On Add Widget


Now Select HTML/JaveCode


Now Paste The Code In Big Box
Click On Save

Now Open Your Blog And See Flying Bird

How to Create Your Own Blog?

How to Create Your Own Blog?

How to Create Your Own Blog?

Ok for this you will have to

Go to Blogger.com.

Sign up. 
How to Creat A blog
Go to Blogger.com.>
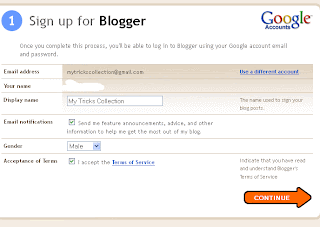
Sign up.  Like I did Shown In the Picture.>

Then Press New Blog.

Create New Blog.

Then On the Next Page Choose Your Blogs Title .
And Url,
Sign up For Blogger

And Alos Select Theme For Your Blog.
Then Press Create Blog.
Now Select your Blog And Press the Pencil mark Or press The New post buttotn and Start Writting Posts.

Stylish And Awesome Search Engine Box For Your Blog & Website

Stylish And Awesome Search Engine Box For Your Blog & Website

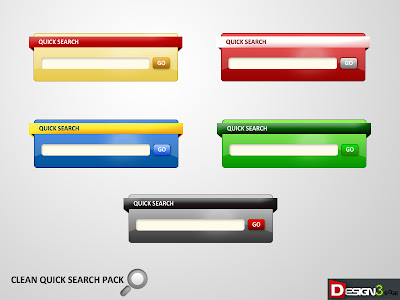
Stylish  And Awesome Search Engine Boxes For Blog & Website

Add a search engine in the sidebar of your blogger blog. This searches all the posts on your blog, and displays them by latest posts first. Inside the search bar you will find the text "Search this Site", this can easily be changed to any text you desire. Such as "Search my Site", "Search", "Type and Hit Enter", etc. Just simply replace the code. You can also change the text "Go" on the button to something like "Search", "Find", etc.


Features:

1.) 5 Stylish And Awesome Designs.
2.) "q" Value Search Coding.
3.) Easy To Use.
4.) Accurate Result.
5.) Quick To Load.

How To Add In Blogspot?

1.) Go To Your www.blogger.com
2.) Open Your Desire Blog.
3.) Go To Layout.
4.) Click "Add A Gadget" Where You Want To Add It.
5.) Now Scroll To "HTML-JAVASCRIPT"
6.) Click "+" Icon To Add It.
7.) Now Copy The Below Code And Paste It To There.
8.) Leave The Title Empty.
9.) Click Save, Now You Are Done.


How To Add In Website?

1.) Just Go To Your HTML File.
2.) Now Copy The Below Code And Paste It Between <body> </body>.
3.) Save It, Now You Are Done.
======X======X======X======
Style 1:
<!-- This Is A CopyRight Search Engine.It Is Free To Use But With HTML Design Code.If AnyOne Found To Be Changing This Code Should Be Under Legal Action. -->
<style type="text/css">
#exe-searchbox{background:url(https://blogger.googleusercontent.com/img/b/R29vZ2xl/AVvXsEgr69YRrsGU875rzzNpJELI1VM208CJNI4x8XXIIBk08tKFexnuvFV2ozHzxV7DTvESzn_qkW6XV_Bu7R4NhIzmCOds_V-oGLAFbmhEm2_RNcmTcRkib3fgybC_MgexIRlBILrs_dAajQ/s1600/Yellow-Search-Engine.png) no-repeat scroll center center transparent;width:310px;height:100px;disaply:block;}
form#exe-searchform{display: block;padding-top:51px; padding-left:30px;;margin:0;}
form#exe-searchform #s{padding-top:3px; padding-left:1px; width: 208px; font-size:14px; vertical-align:top; border:none; background:transparent;}
form#exe-searchform #sbutton{padding-top:10px; padding-right:25px; height:15px; width:15x; border:none; background:transparent;}
</style>
<div id="exe-searchbox">
<form id="exe-searchform" action="/search" method="get">
<input type="text" id="s" name="q" value="Search Here..." onfocus='if (this.value == "Search Here...")
{this.value = ""}' onblur='if (this.value == "") {this.value = "Search Here...";}'/>
<input type="image" src="http://img1.blogblog.com/img/blank.gif" id="sbutton" />
</form><div dir="ltr" style="text-align: left;" trbidi="on">
<div style="text-align: center;">
<a href="http://trickshome786.blogspot.com/2013/06/Stylish-Search-Engine.html" target="_blank"><span style="color: #bf9000;"><span style="font-size: small;">Get This Widget</span></span></a></div>
</div>

======X======X======X======
Style 2:

<style type="text/css">
#exe-searchbox{background:url(https://blogger.googleusercontent.com/img/b/R29vZ2xl/AVvXsEgAmyoVcgq868DVr2NtlWsqt87Svc7n2HjHBm_mL9YI5G7onbTFVMkh3-AgZmpGVervE0Ys6YsABHkh0VDVwWzWMj44jEWo6g5GjNi_H4VDru7X0qCePnlgci9kZembLBD3Y8rmu3LdGA/s1600/Black-Search-Engine.png) no-repeat scroll center center transparent;width:310px;height:100px;disaply:block;}
form#exe-searchform{display: block;padding-top:51px; padding-left:30px;;margin:0;}
form#exe-searchform #s{padding-top:3px; padding-left:1px; width: 208px; font-size:14px; vertical-align:top; border:none; background:transparent;}
form#exe-searchform #sbutton{padding-top:10px; padding-right:25px; height:15px; width:15x; border:none; background:transparent;}
</style>
<div id="exe-searchbox">
<form id="exe-searchform" action="/search" method="get">
<input type="text" id="s" name="q" value="Search Here..." onfocus='if (this.value == "Search Here...")
{this.value = ""}' onblur='if (this.value == "") {this.value = "Search Here...";}'/>
<input type="image" src="http://img1.blogblog.com/img/blank.gif" id="sbutton" />
</form><div dir="ltr" style="text-align: left;" trbidi="on">
<div style="text-align: center;">
<span style="font-size: small;"><a href="http://trickshome786.blogspot.com/2013/06/Stylish-Search-Engine.html" target="_blank"><span style="color: black;">Get This Widget</span></a></span></div>
</div>

======X======X======X======

Style 3:

<style type="text/css">
#exe-searchbox{background:url(https://blogger.googleusercontent.com/img/b/R29vZ2xl/AVvXsEgNwOw4xTxS4vP27iYva14PY7K1st_7XsA92DcPkK7Vof43kyn96Qkt5Vv-HPjgNO27qI8UCtYGPerZURENzBgMUXoLrxrvS-qOqrh06aDKl_7QO7PZmPriz5fLlSJesi9WF2tzJdC23Q/s1600/Blue-Search-Engine.png) no-repeat scroll center center transparent;width:310px;height:100px;disaply:block;}
form#exe-searchform{display: block;padding-top:51px; padding-left:30px;;margin:0;}
form#exe-searchform #s{padding-top:3px; padding-left:1px; width: 208px; font-size:14px; vertical-align:top; border:none; background:transparent;}
form#exe-searchform #sbutton{padding-top:10px; padding-right:25px; height:15px; width:15x; border:none; background:transparent;}
</style>
<div id="exe-searchbox">
<form id="exe-searchform" action="/search" method="get">
<input type="text" id="s" name="q" value="Search Here..." onfocus='if (this.value == "Search Here...")
{this.value = ""}' onblur='if (this.value == "") {this.value = "Search Here...";}'/>
<input type="image" src="http://img1.blogblog.com/img/blank.gif" id="sbutton" />
</form><div dir="ltr" style="text-align: left;" trbidi="on">
<div style="text-align: center;">
<span style="color: #0b5394; font-size: small;"><a href="http://trickshome786.blogspot.com/2013/06/Stylish-Search-Engine.html" target="_blank">Get This Widget</a></span></div>
</div>

======X======X======X======
Style 4:

<style type="text/css">
#exe-searchbox{background:url(https://blogger.googleusercontent.com/img/b/R29vZ2xl/AVvXsEjNGYTjpvQjWEzp5TkR3aAag93Tarnn6fVLOkkwW-_IC6-PCXHukCyA6rW3Yc3HFqmeDeFddFaZkZfoglabHiGvtmRVk9tmbj1N6v65owIR5sd7OCIjfWvPAdfAGLx41FOD8z0KLFyd-A/s1600/Green-Search-Engine.png)
no-repeat scroll center center transparent;width:310px;height:100px;disaply:block;}
form#exe-searchform{display: block;padding-top:51px; padding-left:30px;;margin:0;}
form#exe-searchform #s{padding-top:3px; padding-left:1px; width: 208px; font-size:14px; vertical-align:top; border:none; background:transparent;}
form#exe-searchform #sbutton{padding-top:10px; padding-right:25px; height:15px; width:15x; border:none; background:transparent;}
</style>
<div id="exe-searchbox">
<form id="exe-searchform" action="/search" method="get">
<input type="text" id="s" name="q" value="Search Here..." onfocus='if (this.value == "Search Here...")
{this.value = ""}' onblur='if (this.value == "") {this.value = "Search Here...";}'/>
<input type="image" src="http://img1.blogblog.com/img/blank.gif" id="sbutton" />
</form><div dir="ltr" style="text-align: left;" trbidi="on">
<div style="text-align: center;">
<span style="font-size: small;"><a href="http://trickshome786.blogspot.com/2013/06/Stylish-Search-Engine.html" target="_blank"><span style="color: #6aa84f;">Get This Widget</span></a></span></div>
</div>

======X======X======X======
Style 5:

<style type="text/css">
#exe-searchbox{background:url(https://blogger.googleusercontent.com/img/b/R29vZ2xl/AVvXsEg6GnV-PtEOuMClsUkXp_igRBD9QWCRVPtCVlED37o63V86FramSkmybwdFLJ4etPPjpQrcMM5k4bNrxwFmxEZAwg9dOI7So4l_0bj1a6M-TVIsO0PfmzKqhlfz-3gwCfLuClYZ_n2ayQ/s1600/Red-Search-Engine.png) no-repeat scroll center center transparent;width:310px;height:100px;disaply:block;}
form#exe-searchform{display: block;padding-top:51px; padding-left:30px;;margin:0;}
form#exe-searchform #s{padding-top:3px; padding-left:1px; width: 208px; font-size:14px; vertical-align:top; border:none; background:transparent;}
form#exe-searchform #sbutton{padding-top:10px; padding-right:25px; height:15px; width:15x; border:none; background:transparent;}
</style>
<div id="exe-searchbox">
<form id="exe-searchform" action="/search" method="get">
<input type="text" id="s" name="q" value="Search Here..." onfocus='if (this.value == "Search Here...")
{this.value = ""}' onblur='if (this.value == "") {this.value = "Search Here...";}'/>
<input type="image" src="http://img1.blogblog.com/img/blank.gif" id="sbutton" />
</form><div dir="ltr" style="text-align: left;" trbidi="on">
<div style="text-align: center;">
<span style="font-family: Arial,Helvetica,sans-serif;"><span style="font-size: small;"><a href="http://trickshome786.blogspot.com/2013/06/Stylish-Search-Engine.html" target="_blank"><span style="color: #e06666;">Get This Widget</span></a></span></span></div>
</div>,,

Thursday, August 29, 2013

Toshiba Satellite C660 Drivers Windows 7 32 Bit

Toshiba Satellite C660 Drivers


Download drivers Toshiba Satellite C660 Windows 7 32 Bit

Toshiba Satellite C660 Drivers


Toshiba Satellite C660 BIOS Update Driver
Download 

Toshiba Satellite C660 Bluetooth Filter Driver
Download

Toshiba Satellite C660 Bluetooth Monitor Driver
Download

Toshiba Satellite C660 Bluetooth Stack Driver
Download

Toshiba Satellite C660 Card Reader Controller Driver
Download

Toshiba Satellite C660 Chip Set Utility Driver
Download

Toshiba Satellite C660 Display Driver
Download

Toshiba Satellite C660 Intel Management Engine Interface Driver
Download

Toshiba Satellite C660 Rapid Storage Technology Driver
Download

Toshiba Satellite C660 LAN Driver
Download

Toshiba Satellite C660 Sound Driver
Download

Toshiba Satellite C660 Touch Pad Driver
Download

Toshiba Satellite C660 Webcam Driver
Download

Toshiba Satellite C660 Wireless LAN Indicator Driver
Download

Toshiba Satellite C660 Wireless Lan Driver

Wednesday, August 28, 2013

Passowrd Protected USB

How To Make Passowrd Protected USB Flash Drives


 Losing a USB drive or other mobile devices in which you store your valuable information can cost you a lot if accessed by any unauthorized person. The same may happen if it falls into the wrong hands. So, is there a way by which you can avoid such panic? Of course yes! The Kashu System Design of Japan has come up with a unique product – KASHU USB Flash Security!


What is KASHU USB Flash Security?

Well, KASHU USB Flash Security is a program, a free utility for password protecting USB keys and other sensitive data stored in it.

How does it help

The KASHU USB Flash Security allows users to generate a password necessary for accessing the protected data on the USB key. The data is encrypted using powerful AES 256-bit encryption. As mentioned, your valuable information or sensitive data can fall into the wrong hands hence, the program. Also, there are too many security software designed and developed for computer but very few for mobile devices.

How to use KASHU USB Flash Security program

Before you start, download the program and install it on your Windows-based computer. During the process, you will be greeted by a wizard that will guide you through the steps required to install the Flash Security. Simply follow it. When done, a small icon will be visible on your computer screen as a shortcut.
USB Flash Security System Wizard 400x343 Password Protect USB Drives using KASHU USB Flash Security
Now, to install the USB Flash security on your USB drive, connect it to your computer and run the flash security program using the shortcut icon. When you run the program you will observe that the program window displays USB drive as a tab. Check out the screenshot below.
USB Flash Security Install 400x249 Password Protect USB Drives using KASHU USB Flash Security
Select the desired USB drive and click on ‘Install’. Before this action, make sure that you have a backup of all the data as it will be deleted from the target drive when you install Flash Security program on it.
If a warning is displayed, ignore it and hit the ‘OK’ button and proceed further.

USB Flash Security Confirmation 400x243 Password Protect USB Drives using KASHU USB Flash Security
Then, enter a password you would like to use for password protecting your USB data and if required, enable the ‘Encryption’ option too. The step is however optional.
USB Flash Security password 315x400 Password Protect USB Drives using KASHU USB Flash Security
When the installation is complete, only two files will be visible under the protected USB drive, i.e. autorun.inf and usbenter.exe. This indicates that your USB drive is now protected. Next time you insert the same USB drive, you should notice a password entry dialog. If you do not see it, just open the USB drive in Explorer and double-click on usbenter.exe.
USB Flash Security USB Enter Password Protect USB Drives using KASHU USB Flash Security
Also, to access your data you will need to enter the correct password. Once you do it you will be able to view all the content in the normal way. If you would like to lock it again, simply pull the USB flash drive out from your computer.
USB Flash Security Release 400x227 Password Protect USB Drives using KASHU USB Flash Security
You can download the Kashu USB Flash Security Free from here. The program is free for personal use, but the freeware version works only on upto  4GB USB’s. However, to use it you will need to install it on your Windows based computer.


Run Software Without Installing Them On Windows PC

How To Run Software Without Installing Them On Windows PC


If you are annoyed by the cumbersome and time taking installation process of the downloaded software, Zero Install is the best program for you to try. Instead of installing the software on your system, you can simply catch them and use whenever you want; without downloading them again. Moreover, if any software is not cached in Zero Install it will automatically download it to your Windows PC.


Zero Install allows user to use software directly from the web without installing it on the computer system. Users do not actually need to download, extract and install the software to use it. Zero Install can run it without the need of privileged roots.
Zero Install caches the software when it is first time downloaded from the internet and the program then run the software from the cache. Zero Install uses the URL of a program and runs it on your computer system. In other words it allows user to use the software directly from their web-sites. The application unpacks its own directory inside the cache and you can access the software.
Zero Install is a cross-platform and it can install the packages in system locations which do not require administrator access and affects only the user installing it, thus all the users of a PC can install the package and run any new software. Furthermore it does not need any root password to install the software on PC.

How to Use Zero Install

  • Just download the required version from 0install and install it on your computer system. It won’t take more than a few second to install if you have a decent speed internet connection.
  • Zero Install has a big collection of apps in ‘Catalogue’ where you can look and run any app without installing it on your system.
  • If you like any application, you can add it to the list of ‘My Applications’ for easy access next time.
  • You can also add any new application to the list.
Zero Install identifies all packages from URLs and there is no centralized distribution repository to store the cache. When you install a different version of any software, it shares library and both files are stored parallel in the library. Each downloaded program is stored in its own cache directory within the Zero Install program. It also checks for the updates automatically whenever you run software and receive the latest software versions automatically without any reinstall or restart.
Zero Install defies an XML metadata format which can be used multiple platforms like Mac OS X, FreeBSD, Fedora, Debian, Ubuntu and Windows. You can download it
here.


http://adf.ly/z0wlB

Remove Message: Disk Is Write Protected

How To Remove Message: Disk Is Write Protected


Sometimes you may receive a message saying that the Disk is write-protected when dealing with external storage devices. This may mean the registry entry is corrupt, your system administrator has placed limitations or the device itself is corrupt. It may also mean the storage device is actually write-protected.

Disk Is Write-Protected

The following tutorial aims to help you remove the message saying Disk is write protected. the exact message would be:

The disk is write-protected

Remove the write-protection or use another disk

Is There A Hardware Lock
Some external devices such as pen drives actually carry a hardware lock in form of switch. You need to see if the device is having a switch and if it is pushed to protect the device from accidental writing. Remove the device from computer and if the switch is in on state, push it back to disable write protection.
If the device switch is off and you still get the message or if there is no hardware lock on the device, confirm with your system administrator to see if he has blocked USB ports. If the USB port is not blocked by the admin, let us check the Windows registry to see if it has been changed to lock the USB ports.
Editing The Registry

To check if the registry key is modified by some reason,

  1. Press Windows Key + R
  2. In the Run dialog box that appears, type regedit. Press Enter
  3. You can now see Registry Editor. Expand the key HKEY_LOCAL_MACHINE.
  4. Expand System Folder in the left pane under HKEY_LOCAL_MACHINE
  5. Look for CurrentControlSet and expand it to locate Services
  6. When you expand Services, click on USBSTOR
  7. In the right pane, double click on Start. In the box that appears, enter 3.
  8. Close Registry Editor.

Multibootable USB Creater

The Best Multibootable USB creater Software  by DJ TAHIR


http://adf.ly/z14Ne